
Ready-made modules for CMS
If you use one of the content management systems (CMS) listed below for your website, we suggest considering the possibility of
using special payment plugins that have been prepared specifically to start accepting payments as quickly as possible.
Just select the plugin for the desired CMS and follow the installation instructions.







WordPress
With this plugin for WordPress your customers will be able to make purchases via our payment page.
For this plugin to work, you have to install WooCommerce for WordPress. This plugin was tested with the following versions of WordPress and WooCommerce (see the table below).
| WordPress version | WooCommerce version | Download link |
|---|---|---|
| 4.x or later | 3.x | Download WordPress plugin 5.3.10 Oct 17, 2025 |
Recommended WordPress version: no older than 4.8.3. For this manual the following components and versions were used:
- WordPress 4.7.3
- WooCommerce 3.0
You can download required WooCommerce version at github.com (link to WooCommerce version history).
It is recommended to read WordPress and WooCommerce documentation:
WooCommerce is not compatible with all WordPress themes. In this document we use Storefront theme (external link) that was developed by WooCommerce developers.
Installation
- Enter your admin area.
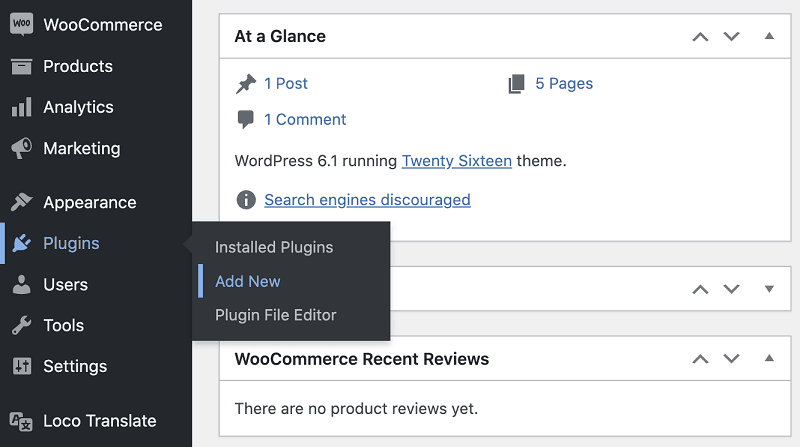
- On the left panel select Plugins > Add New (see the figure below).
The page will look as follows.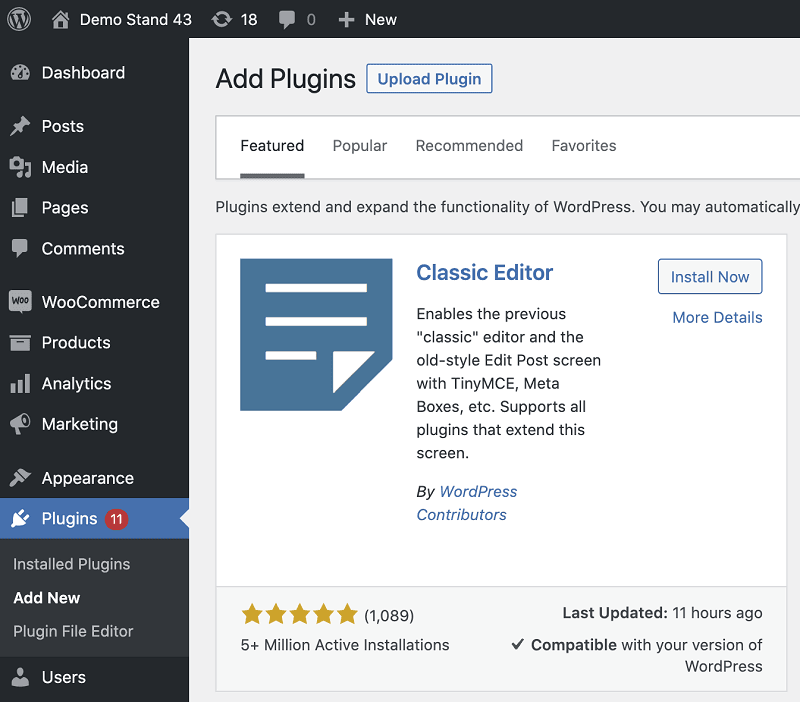
- Click Upload Plugin at the top of the page.
- Choose a file with the plugin you have downloaded before and click Install Now.
Configuration
To configure the payment plugin for WordPress, do the following.
- Enter your admin area.
- On the left panel select Plugins > Installed Plugins (see the figure below).
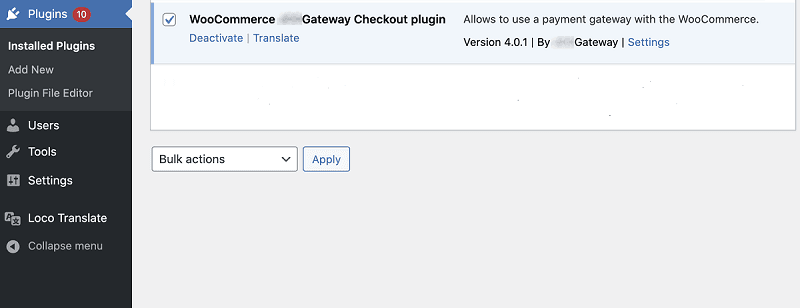
- In WooCommerce Gateway Checkout plugin section click Settings.
The following page will display.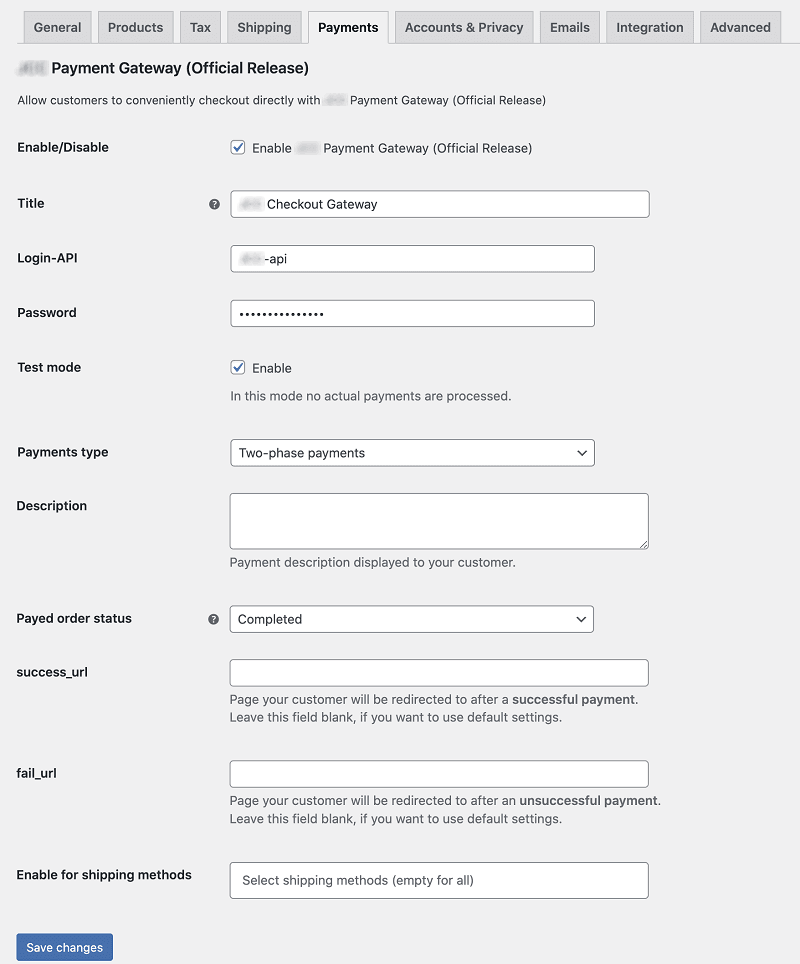
- Adjust the settings using the table below.
| Setting | Description |
|---|---|
| Enable/Disable | Enable/disable the plugin itself. |
| Title | Name of the payment method, for example: Bank card. |
| Login-API | Your API account login. If the plugin works in test mode, enter test API login. If the plugin works in production mode, enter production login. |
| Password | API account password. If the plugin works in test mode, enter test password. If the plugin works in production mode, enter production password. |
| Payments type | Enables/disables two-phase payments. |
| Test mode | Defines plugin work mode: test or production. |
| Description | Enter payment description to be displayed to the customer. |
| Payed order status | Select the status for the paid order. |
| success_url | URL for customer redirection after a successful payment. |
| fail_url | URL for customer redirection after a failed payment. |
| Enable for shipping methods | Select shipping methods if available. |
Click Save changes.
Notifications area will display Your settings saved. Now you can accept payments.
Magento
With this plugin for Magento your customers will be able to make purchases via our payment page.
Stable plugin performance is guaranteed with the following versions of Magento. If you use other versions (for example, after Magento update) the plugin may perform incorrectly.
| Magento version | Download link |
|---|---|
| 2.3.x and later | Download plugin for Magento 1.6.7 Sep 29, 2025 |
Installation
To install Magento payment plugin, follow these steps.
- Unpack the plugin archive and upload contents of the
uploadfolder to your site. The resulting path will be<your site>/app/code/BPC/BPC/<plugin files and folders>. - Access your site using a command line interface, for example, PuTTY (external link).
- Depending on the type of your hosting run the following commands (see the table below).
| VPS/VDS | Regular virtual hosting |
|---|---|
Virtual private/dedicated server. Commands are run from root account.
| Use PHP version as prefix, for example: php-7.1, php-7.2, and so on.
|
Installation complete — proceed to plugin configuration.
To uninstall the plugin, follow this procedure.
Configuration
To configure Magento payment plugin, follow these steps.
- Log in to your Magento admin panel.
- In the left menu select Stores > Configuration (see the figure below).
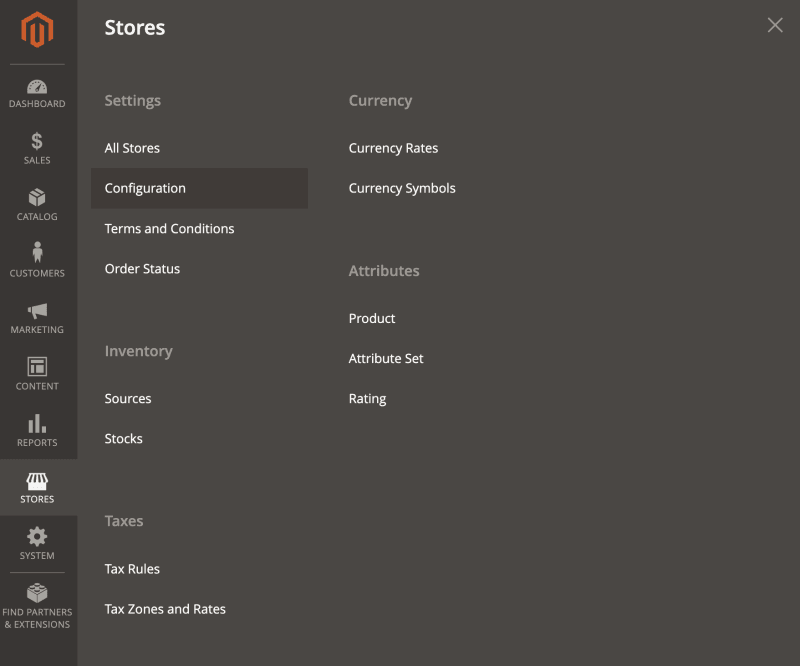
- On the page menu select Sales > Payment Methods (see the figure below).
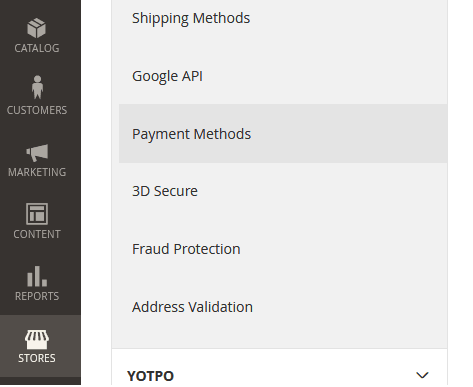
-
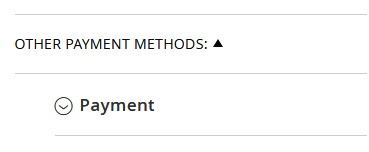
On the displayed page in the Other Payment Methods section scroll to Direct payment with credit/debit card (BPC) (see the figure below).
- Click
 to see the list of the plugin settings (see the figure below).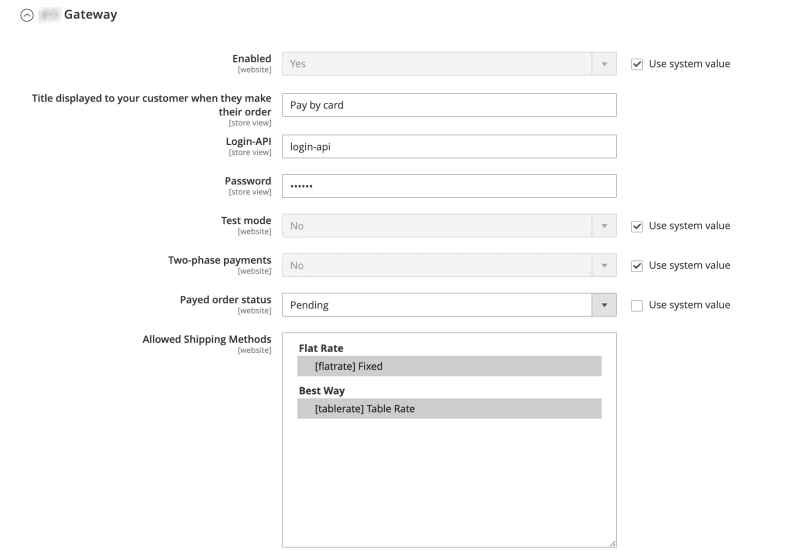
- Adjust the settings (refer to the table below).
| Setting | Description |
|---|---|
| Enabled | Enable/disable the plugin itself. |
| Title displayed to your customer when they make their order | Name of the payment method, for example: Bank card. |
| Login-API | Your API account login. If the plugin works in test mode, enter test API login. If the plugin works in production mode, enter production login. |
| Password | API account password. If the plugin works in test mode, enter test password. If the plugin works in production mode, enter production password. |
| Test mode | Defines plugin work mode: test or production. |
| Two-phase payments | Enables/disables two-phase payments. |
| Payed order status | Select the status in CMS to be assigned to a paid order. |
| Allowed Shipping Methods | Shipping methods the payment method can be used for. |
Click Save Config.
Uninstallation
To uninstall Magento payment plugin, follow these steps.
- Access your site using a command line interface, for example, PuTTY (external link).
- Depending on the type of your hosting run the following commands (see the table below).
| VPS/VDS | Regular virtual hosting |
|---|---|
Virtual private/dedicated server. Commands are run from root account.
| Use PHP version as prefix, for example: php-7.1, php-7.2, and so on.
|
Delete plugin files and folders from your site: app/code/BPC/.
Joomla!
Joomla! & JoomShopping
With this plugin for Joomla! your customers will be able to make purchases via our payment page. This plugin requires JoomShopping extension installed in Joomla!.
Stable plugin performance is guaranteed with the following versions of Joomla! and its extensions. If you use other versions (for example, after Joomla! update) the plugin may perform incorrectly.
| Joomla! version | JShopping version | Download link |
|---|---|---|
| 3.x, 4.x, 5.x | 4.x | Download plugin for Joomla! 1.5.12 Oct 16, 2025 |
Installation
To install the plugin, follow these steps.
-
Log in to your Joomla! administrative panel.
-
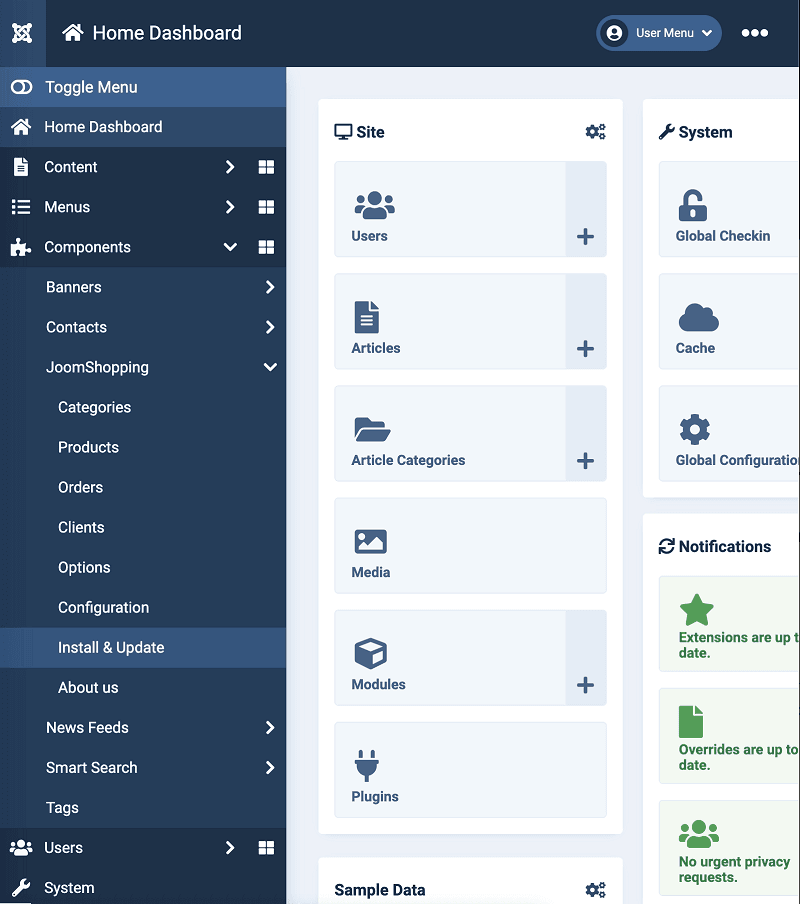
In the left menu, select Components > JoomShopping > Install&Update.
-
In the opened page, click Choose file to browse for the plugin file or specify the URL for uploading the plugin file in the Upload from URL field. Then click Upload.
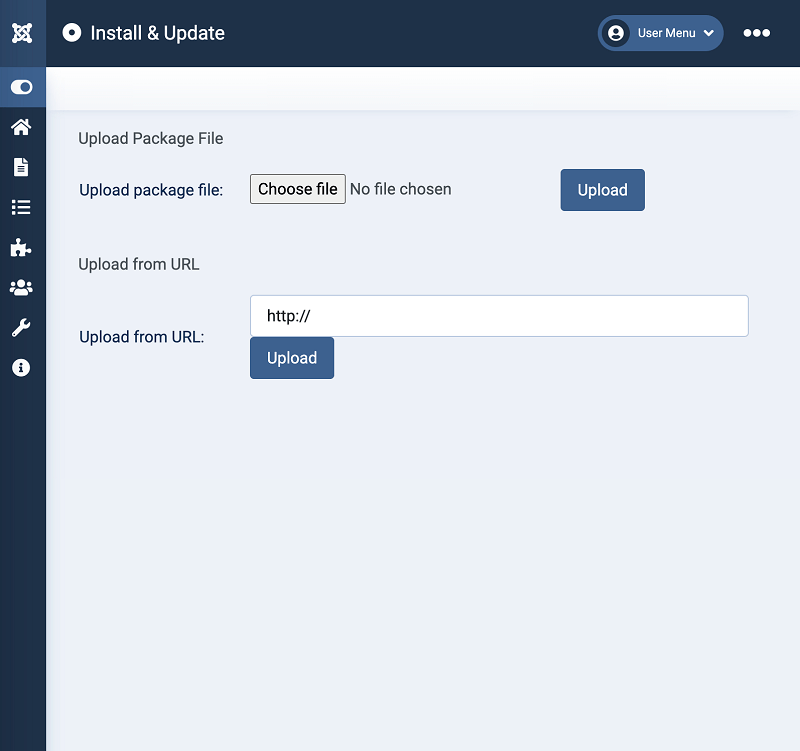
Wait until the upload is completed and the "Completed" message is displayed.
Configuration
To configure the plugin, follow these steps.
-
Login to your Joomla! administrative panel.
-
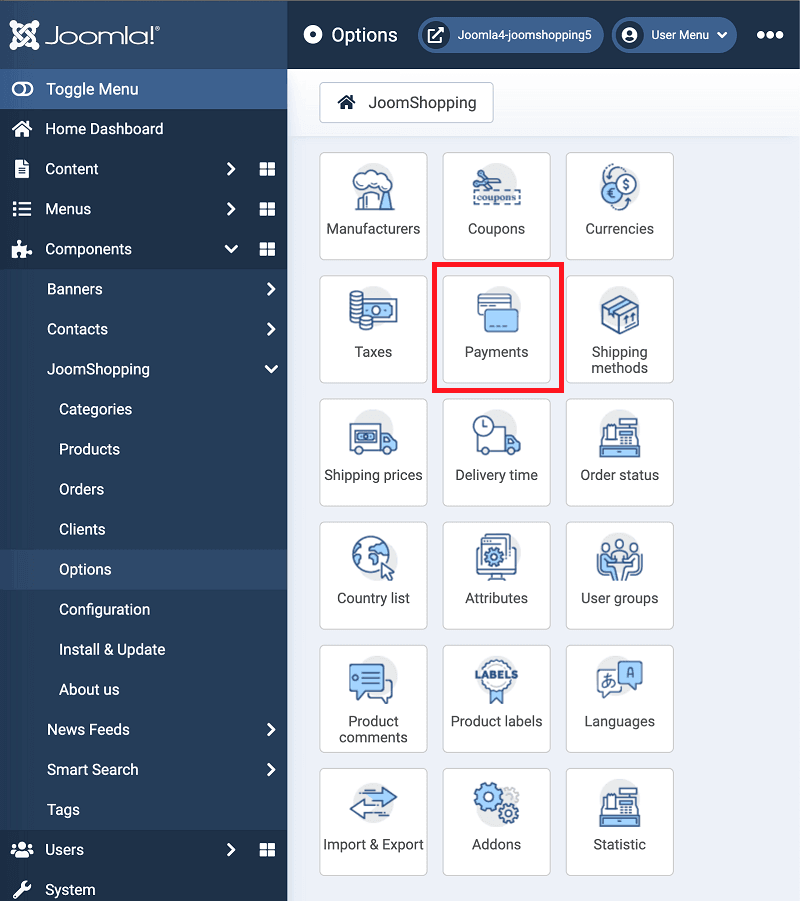
Go to Components > JoomShopping > Options and then select Payments.
-
The Payment list page will open. Click the name of the
BPCplugin.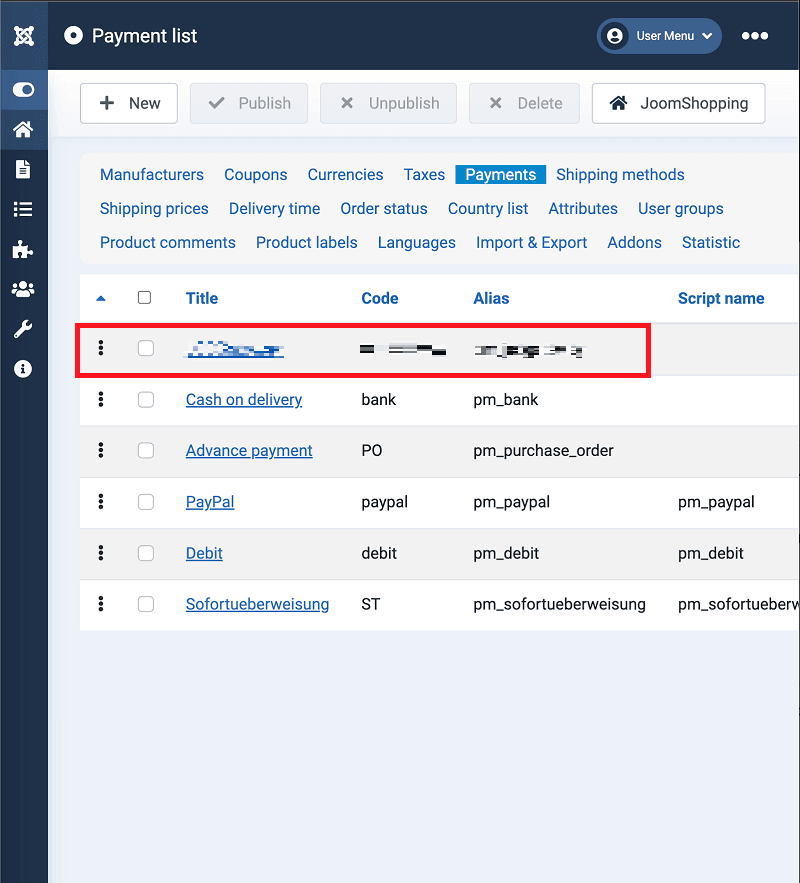
-
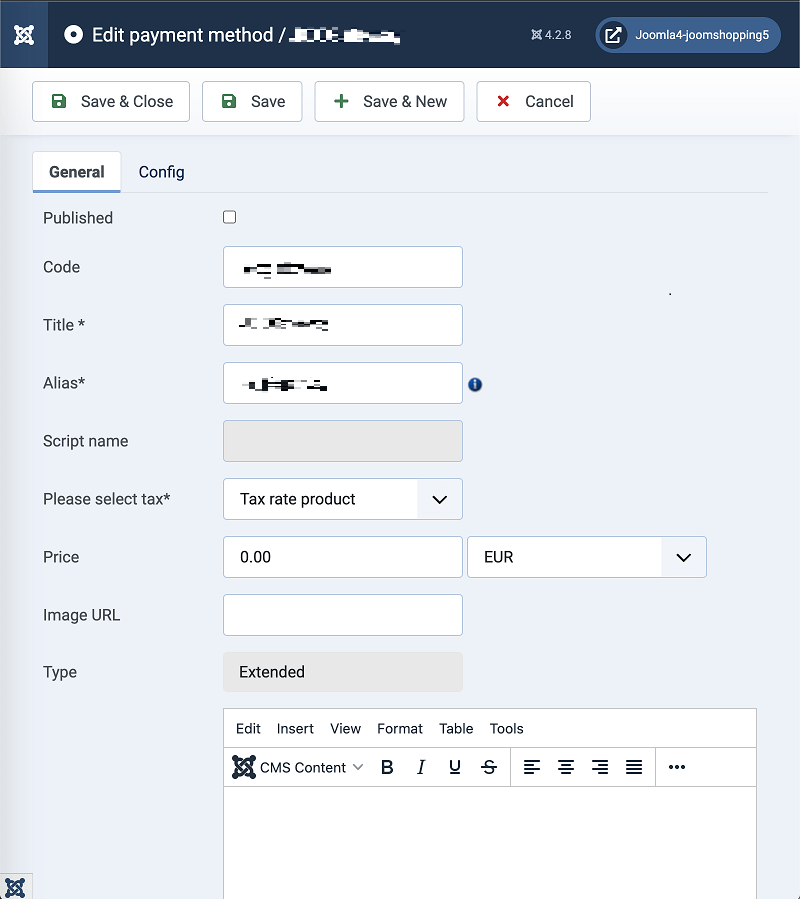
The plugin configuration page will open. The General tab contains general plugin settings. Here you can set Title - the name of the payment method the client will see while creating an order.
The Config tab contains the connection settings. The Advanced settings are related to Joomla! CMS and can be ignored.
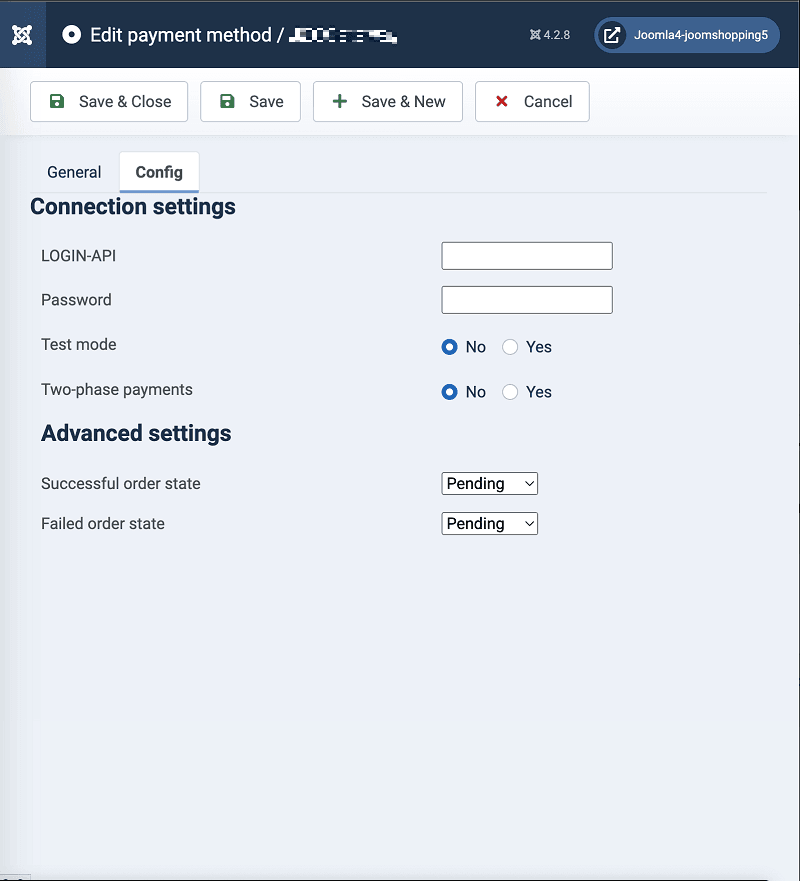
Configure the plugin (see the table below) and then click Save & Close at the top.
| Setting | Description |
|---|---|
| LOGIN-API | Your API account login. If the plugin works in test mode, enter test API login. If the plugin works in production mode, enter production login. |
| Password | API account password. If the plugin works in test mode, enter test password. If the plugin works in production mode, enter production password. |
| Test mode | Defines plugin work mode: test or production. |
| Two-phase payments | Enables/disables two-phase payments. |
| Successsful order state | Joomla order status for a successfull payment . |
| Failed order state | Joomla order status for a failed payment . |
| Setting | Description |
|---|
Joomla! & VirtueMart
With this plugin for Joomla! your customers will be able to make purchases via our payment page. This plugin requires JoomShopping extension installed in Joomla!.
Stable plugin performance is guaranteed with the following versions of Joomla! and its extensions. If you use other versions (for example, after Joomla! update) the plugin may perform incorrectly.
| Joomla! version | VirtueMart version | Download link |
|---|---|---|
| 4.x | 3.8.x | Download plugin for Joomla! 2.4.3 Oct 16, 2025 |
Installation
-
Log in to your Joomla! administrative panel.
-
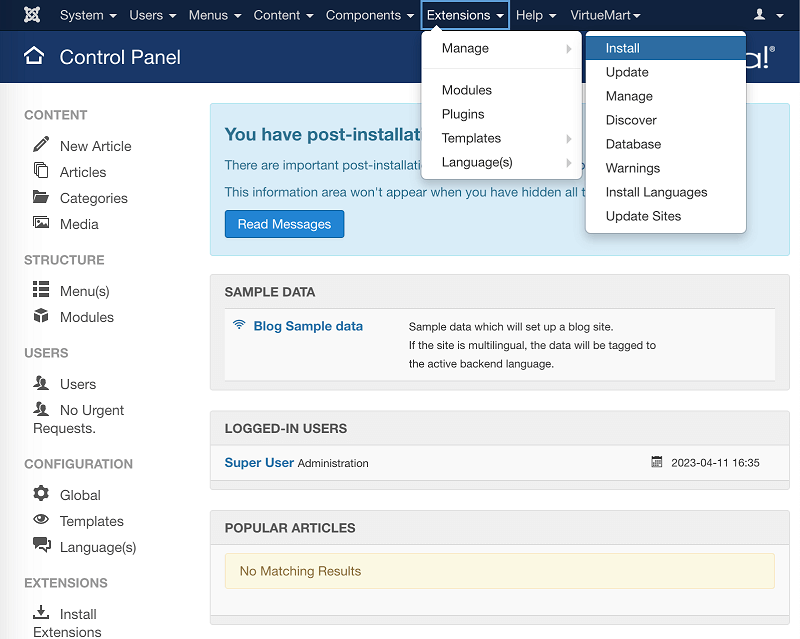
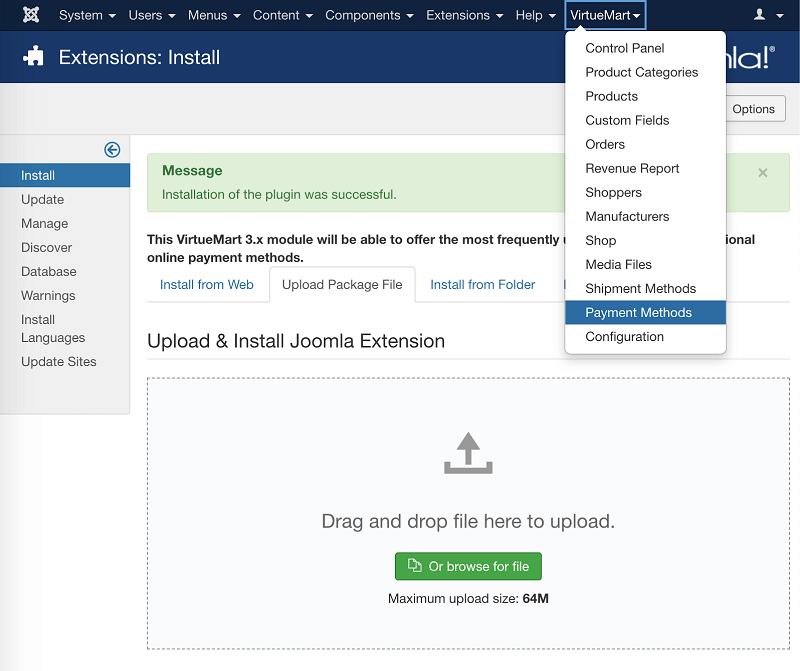
In the top menu, select Extensions > Manage > Install.
-
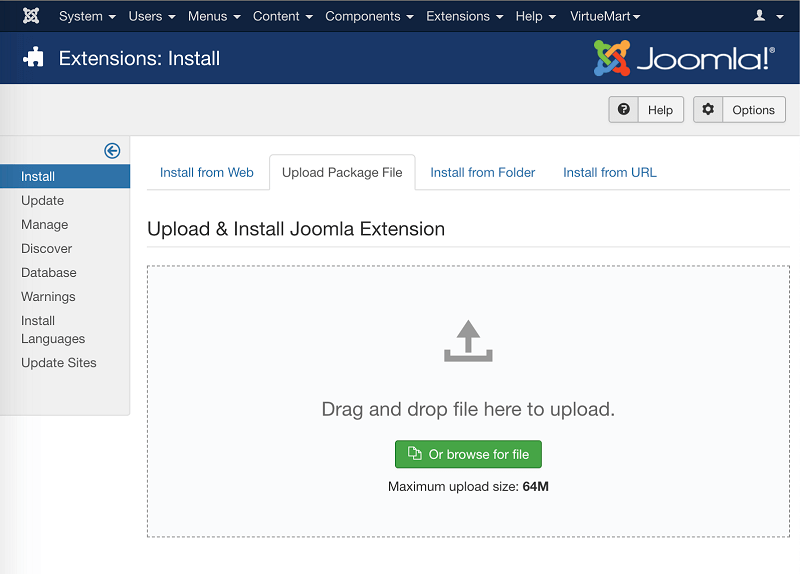
In the opened page, click Or browse for file to browse for the plugin file or drag and drop the file to upload. Then click Upload.
Wait until the upload is completed and the "Installation of the plugin was successful" message is displayed.
-
In the top menu, select VirtueMart > Payment Methods.
-
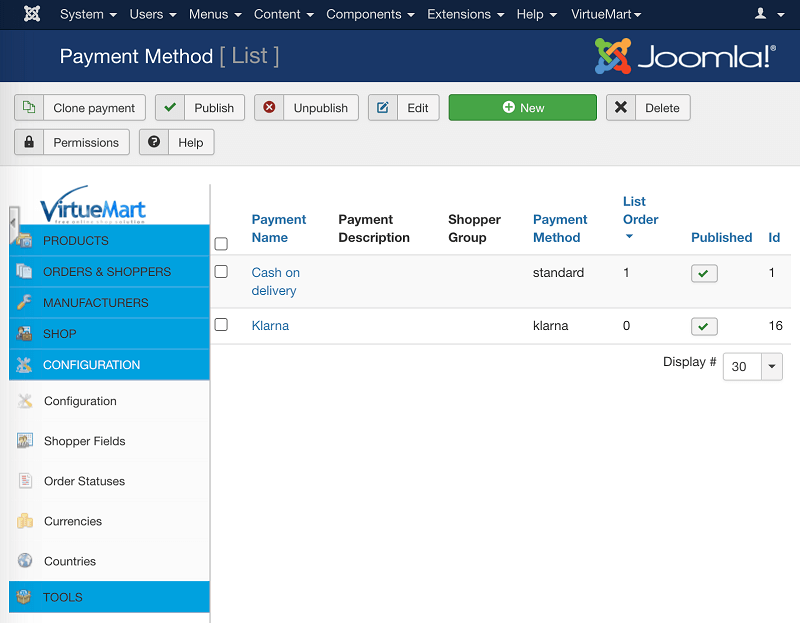
The payment methods list will open. Click New at the top to create a new payment method.
-
In the opened Payment Method window configure the settings of the new payment method. In the Payment Method field select
VM Payment - BPC Module.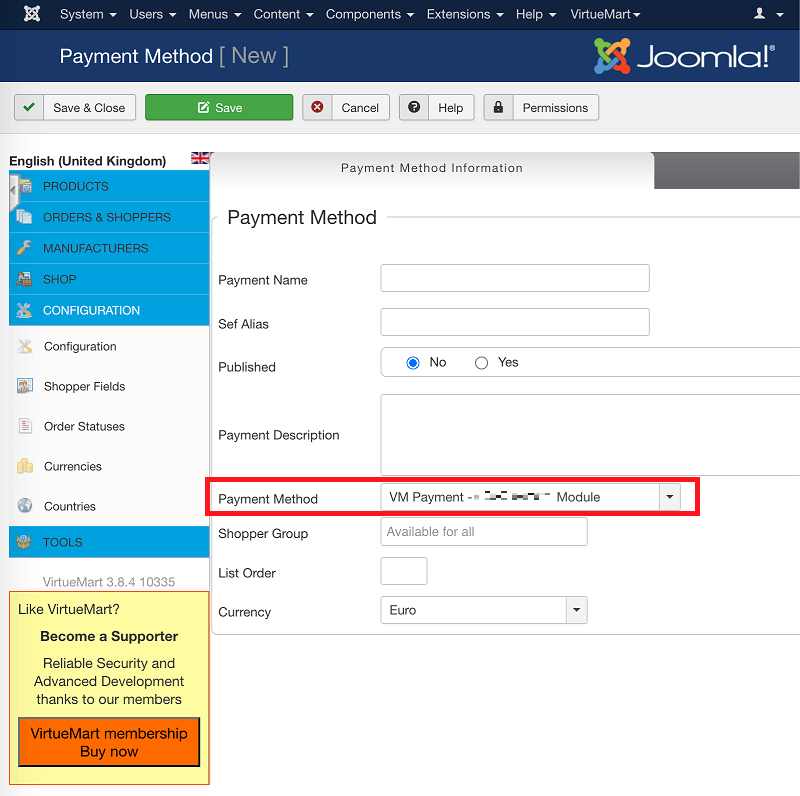
Configuration
To configure the plugin, follow these steps.
-
Login to your Joomla! administrative panel.
-
Go to VirtueMart > Payment Methods.
-
In the list of payment methods click the name of the payment method that uses the
BPCplugin . The configuration page will open.
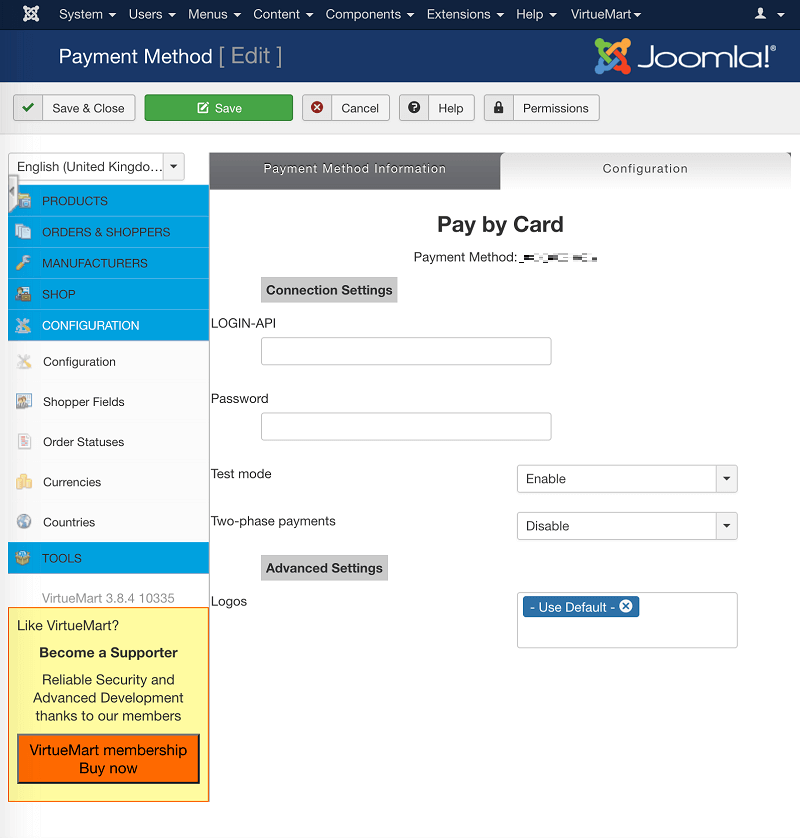
Configure the plugin (see the table below) and then click Save at the top.
| Setting | Description |
|---|---|
| LOGIN-API | Your API account login. If the plugin works in test mode, enter test API login. If the plugin works in production mode, enter production login. |
| Password | API account password. If the plugin works in test mode, enter test password. If the plugin works in production mode, enter production password. |
| Test mode | Defines plugin work mode: test or production. |
| Two-phase payments | Enables/disables two-phase payments. |
| Setting | Description |
|---|
Drupal
With this plugin for Drupal your customers will be able to make purchases via our payment page. For this plugin to work, Drupal Commerce module must be installed.
This plugin requires the following versions of Drupal and Drupal Commerce.
| Drupal version | Drupal Commerce version | Download link |
|---|---|---|
| 8.x/9.x/10.x | 2.x, 3.x | Download Drupal plugin 8.x/9.x/10.x 2.1.10 Sep 30, 2025 |
Installation
To install the plugin, follow these steps.
- In the top menu select Manage > Extend and click Install new module.
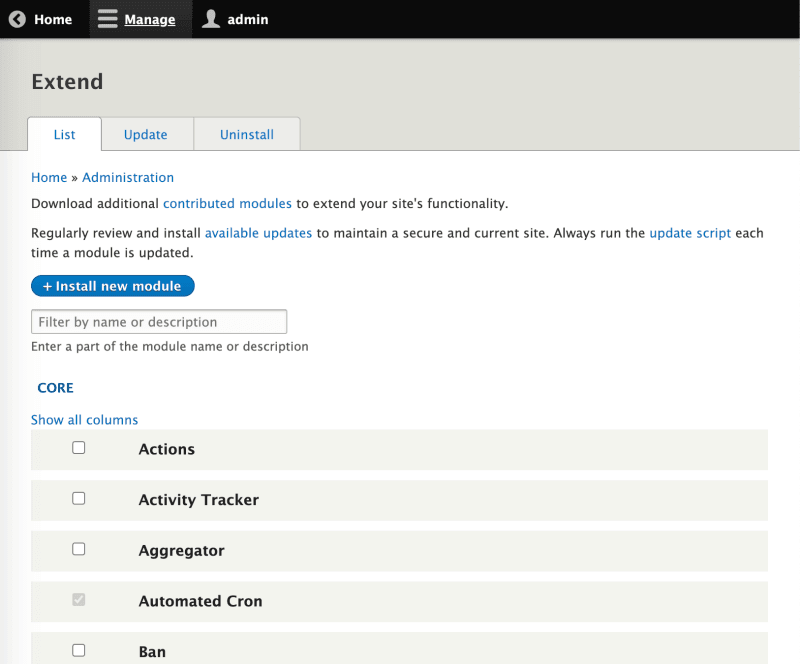
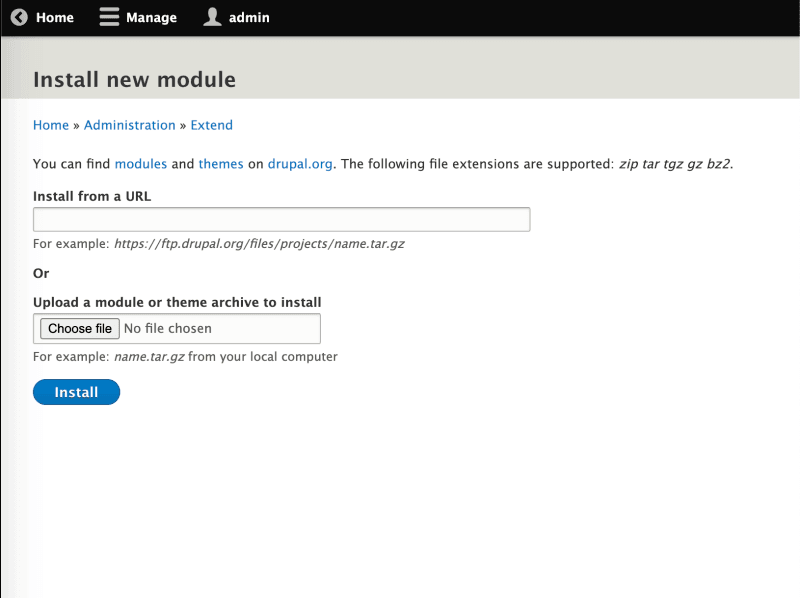
- In the Upload a module or theme archive to install click Choose file and specify the path to the plugin archive.
Wait for the success message.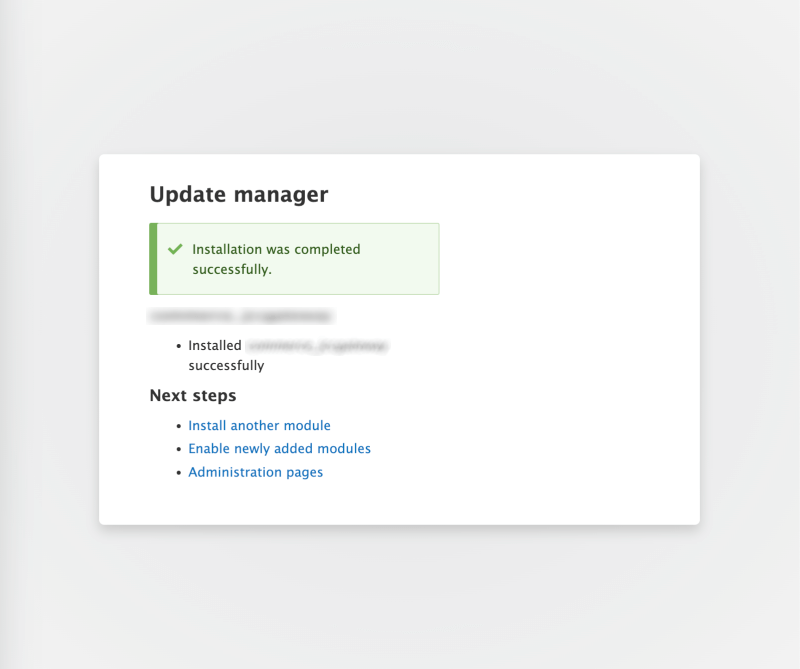
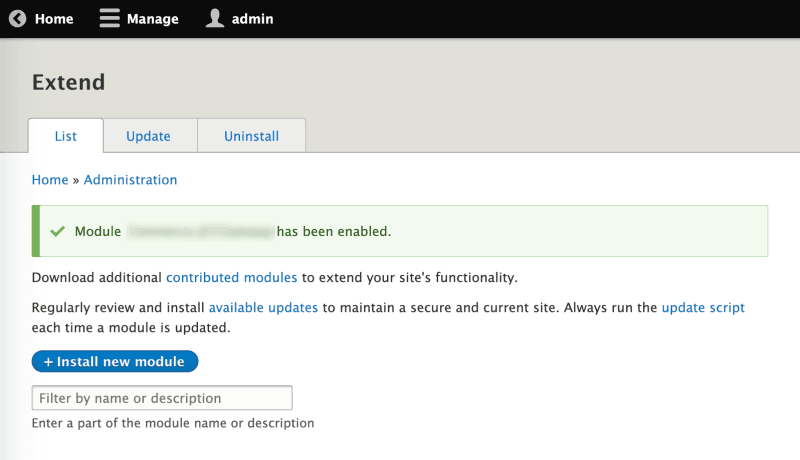
- Enable Commerce BPC module (see the figure below).
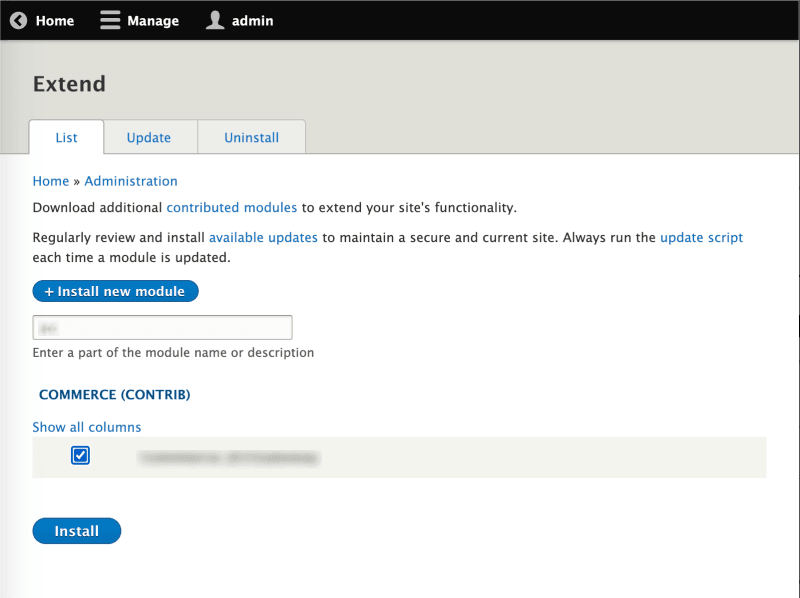
Wait for the module to be installed.
Configuration
To configure the payment plugin, do the following.
- In the top menu select Manage > Commerce > Configuration > Payment > Payment gateways.
The following page will open.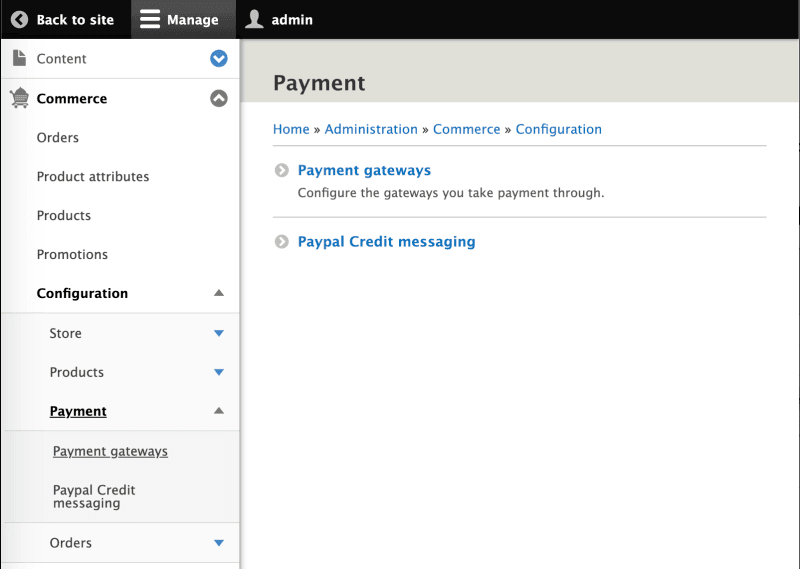
- Click Add payment gateway.
The following page will open.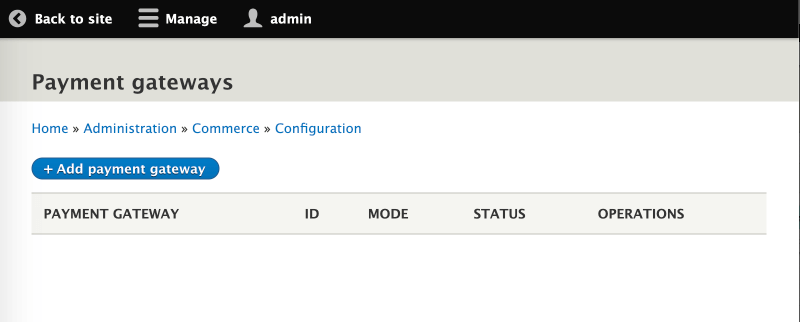
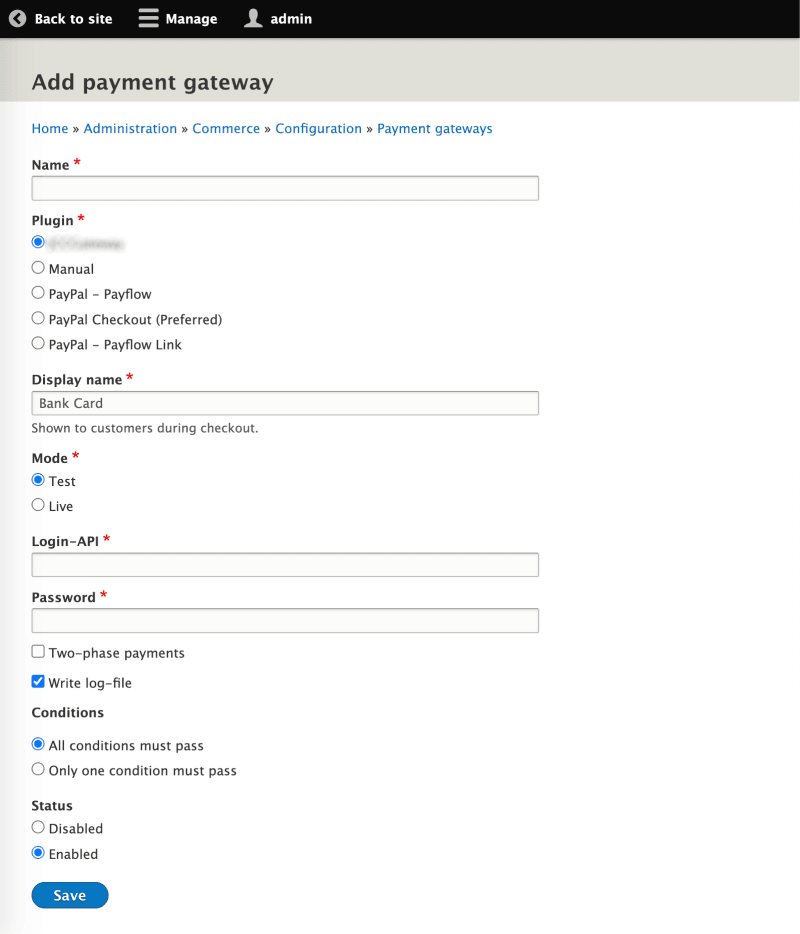
- Select BPC.
- Configure the payment plugin, referring to the table below the screenshot.
| Setting | Description |
|---|---|
| Display name | Name of the payment method, for example: Bank card. |
| Mode | Defines plugin work mode: test or production. |
| Login-API | Your API account login. If the plugin works in test mode, enter test API login. If the plugin works in production mode, enter production login. |
| Password | API account password. If the plugin works in test mode, enter test password. If the plugin works in production mode, enter production password. |
| Two-phase payments | Enables/disables two-phase payments. |
| Write log-file | Enable/disable event log. |
| Conditions | Block of settings added by Drupal Commerce itself. The settings refer to its own rules and logic for displaying the specified method of receiving funds. |
| Status | Enable/disable the plugin itself. |
Click Save to save the settings.
OpenCart
With this plugin for OpenCart your customers will be able to make purchases via our payment page.
| OpenCart version | Download link |
|---|---|
| 4.x | Download plugin for OpenCart 4.x 1.0.11 Oct 16, 2025 |
| 3.x | Download plugin for OpenCart 3.x 3.2.10 Oct 16, 2025 |
| 2.3.x | Download plugin for OpenCart 2.3.x 3.2.6 Oct 16, 2025 |
Installation
To install the payment plugin, do the following.
- Log in to your site as administrator and in the side menu select Extensions > Installer.
The following page will display.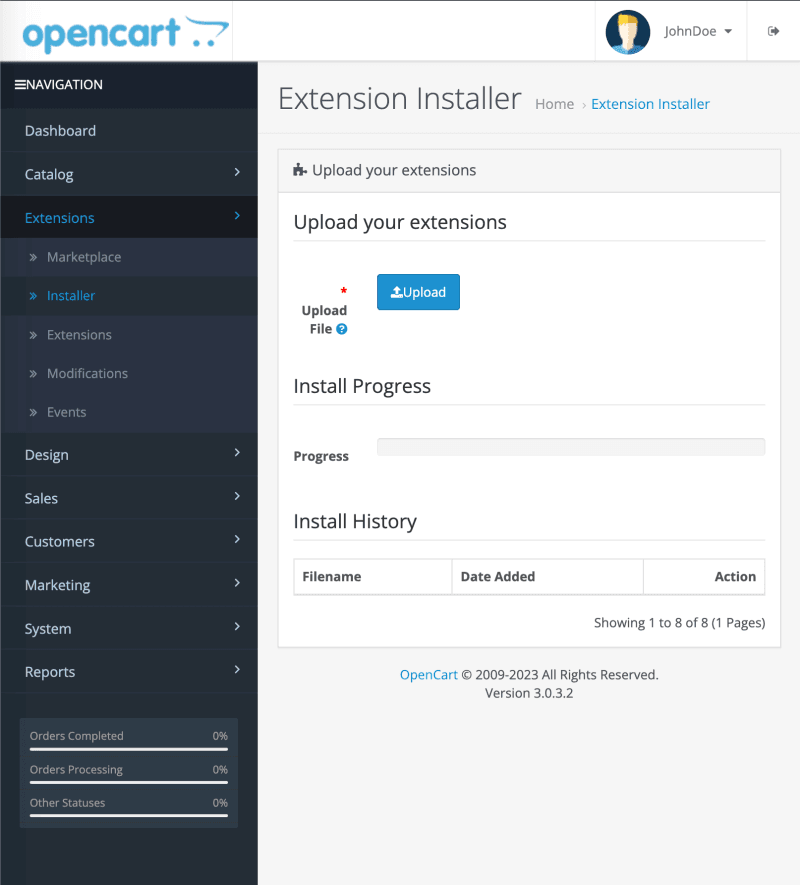
- Click on Upload and naviagate to it in the standard Open-File dialog.
- Wait for the installation process to finish.
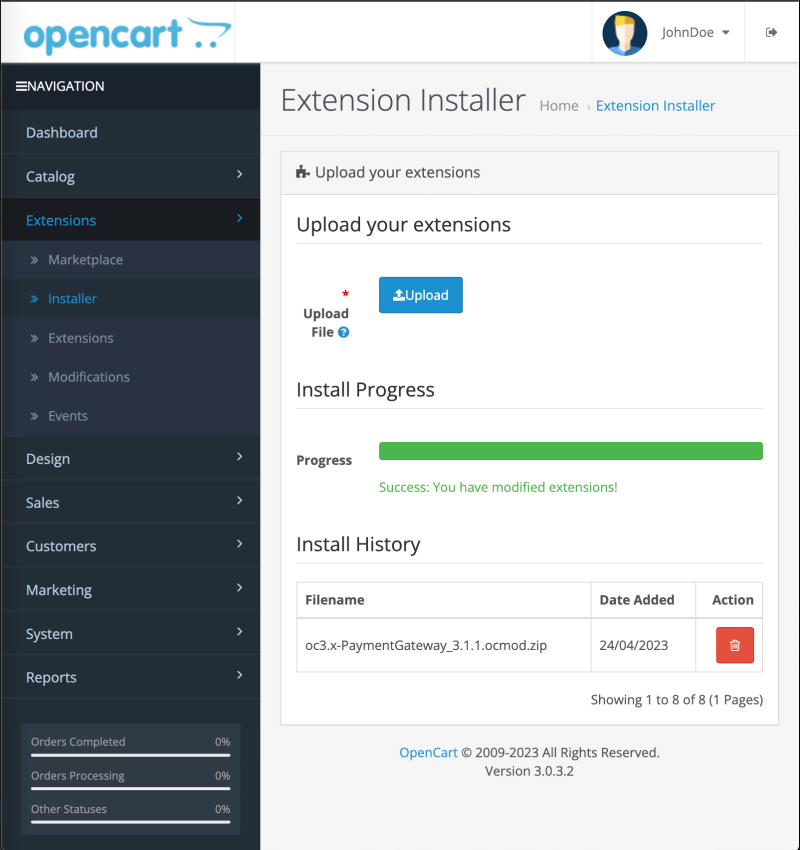
- In the side menu select Extensions > Extensions. In the Choose the extension type select Payments. The page will look as follows.
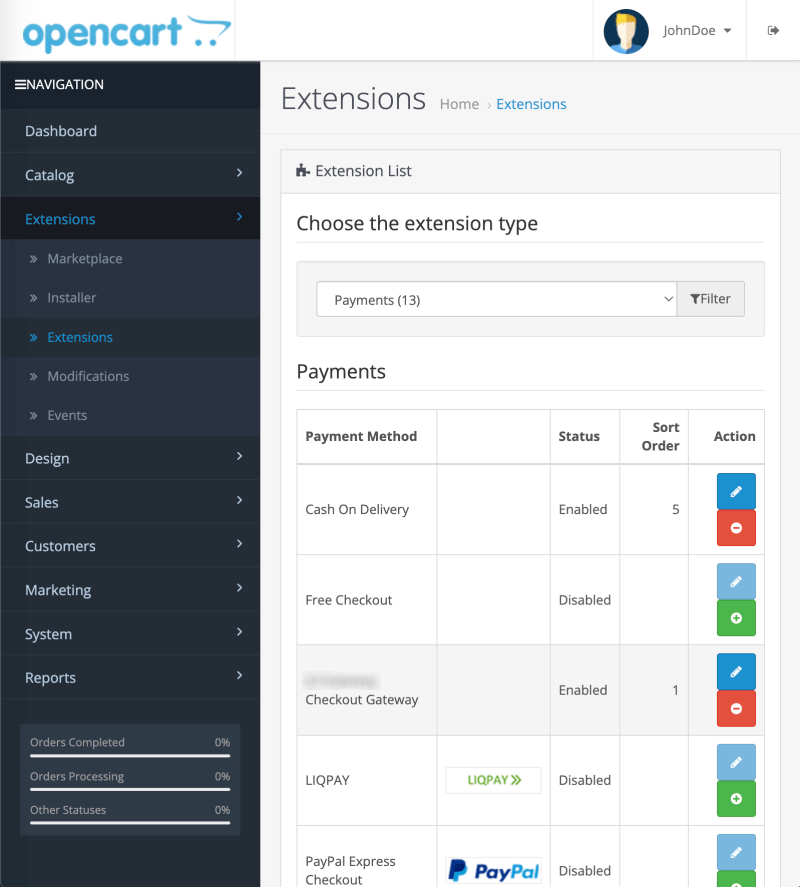
- Next to
Checkout Gatewayclick (Install).
 - Proceed to plugin configuration.
Configuration
To configure the payment plugin, do the following.
- Log in to your site as administrator and in the side menu select Extensions > Extensions.
- In the Choose the extension type select Payments.
- Next to
Checkout Gatewayclick (Edit).
The following page will display.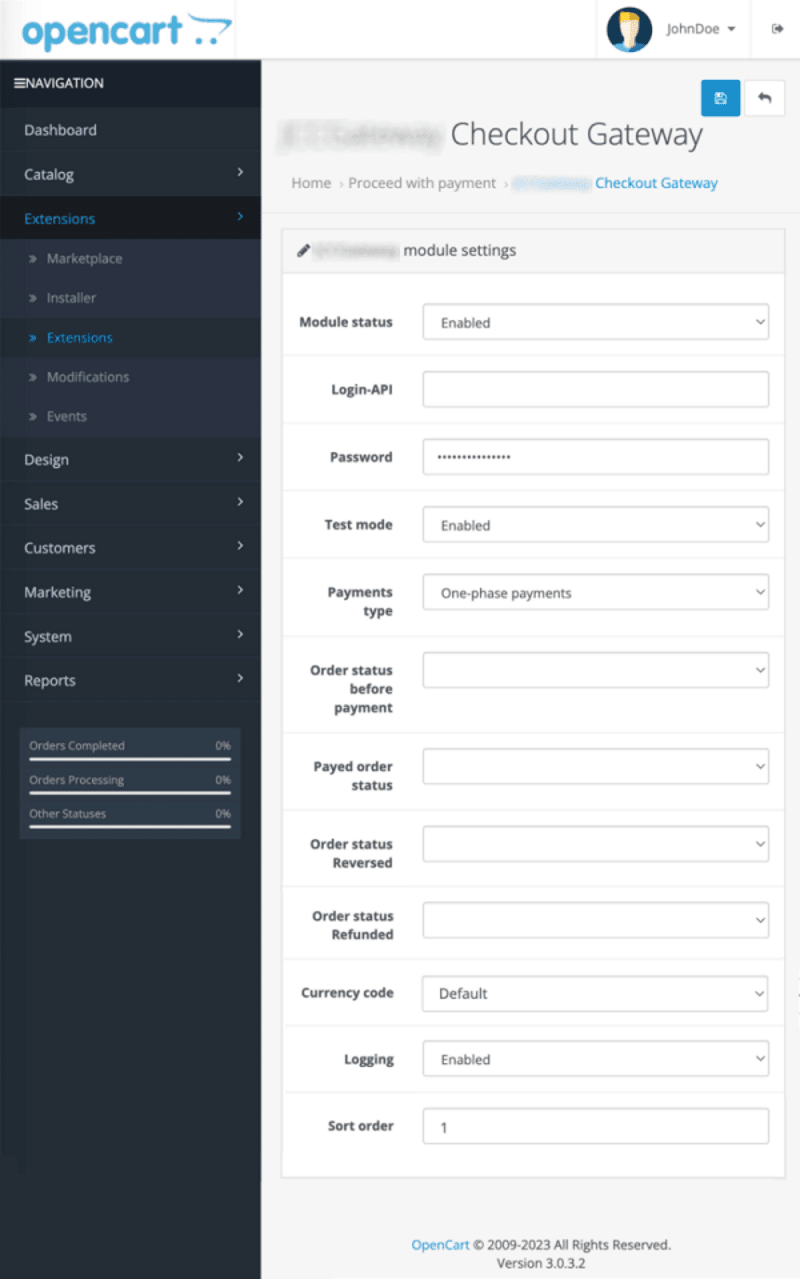
- Adjust the settings using the table below.
| Setting | Description |
|---|---|
| Module status | Enable/disable the plugin itself. |
| Login-API | Your API account login. If the plugin works in test mode, enter test API login. If the plugin works in production mode, enter production login. |
| Password | API account password. If the plugin works in test mode, enter test password. If the plugin works in production mode, enter production password. |
| Test mode | Defines plugin work mode: test or production. |
| Payments type | Enables/disables two-phase payments. |
| Order status before payment | Allows to specify what status CMS will assign to the order before the response about the successful payment is received from the payment gateway. |
| Order status Reversed | Select the status in CMS to be assigned to a reversed order. |
| Order status Refunded | Select the status in CMS to be assigned to a refunded order. |
| Currency code | Select the currency you plan to use or leave the default value. |
| Logging | Enable/disable event log. |
| Sort order | Allows to specify the display position in the list of payment systems when the client places an order. |
Click  (Save) in the upper right corner of the page.
CS-Cart
With this plugin for CS-Cart your customers will be able to make purchases via our payment page.
Installation
To install the payment plugin, do the following.
- Log in to your site as administrator and select Add-ons, click
 and select Manual installation.
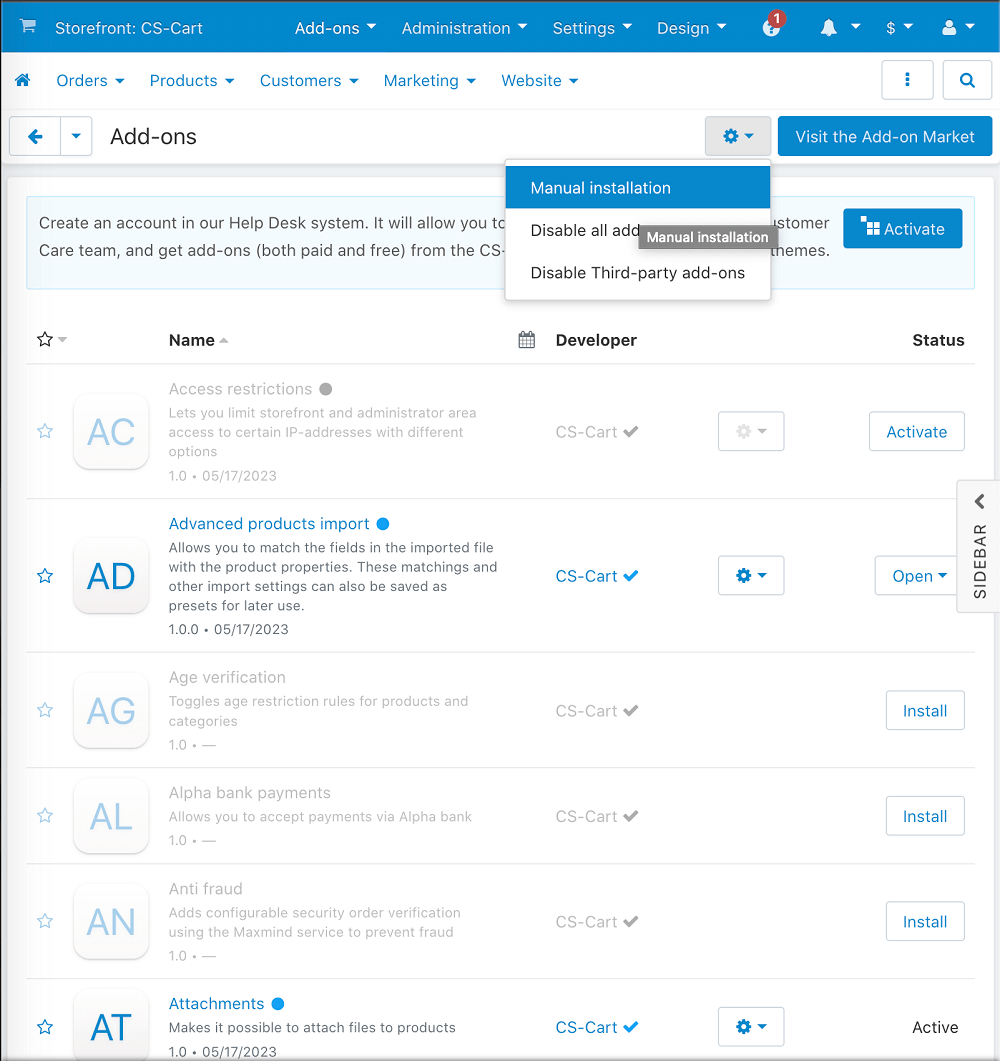
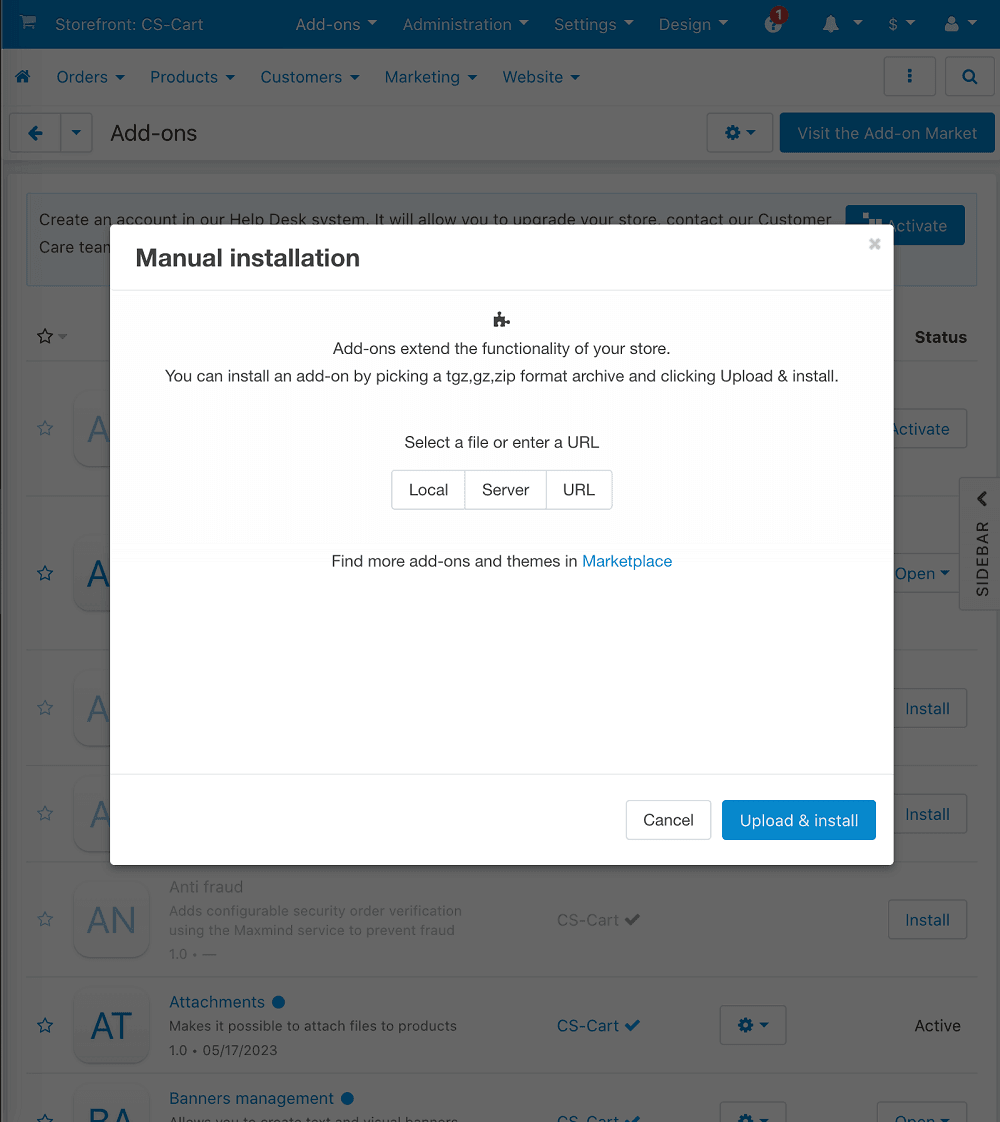
- In the opened Manual installation page click Local, select the downloaded archive and click Upload & install.
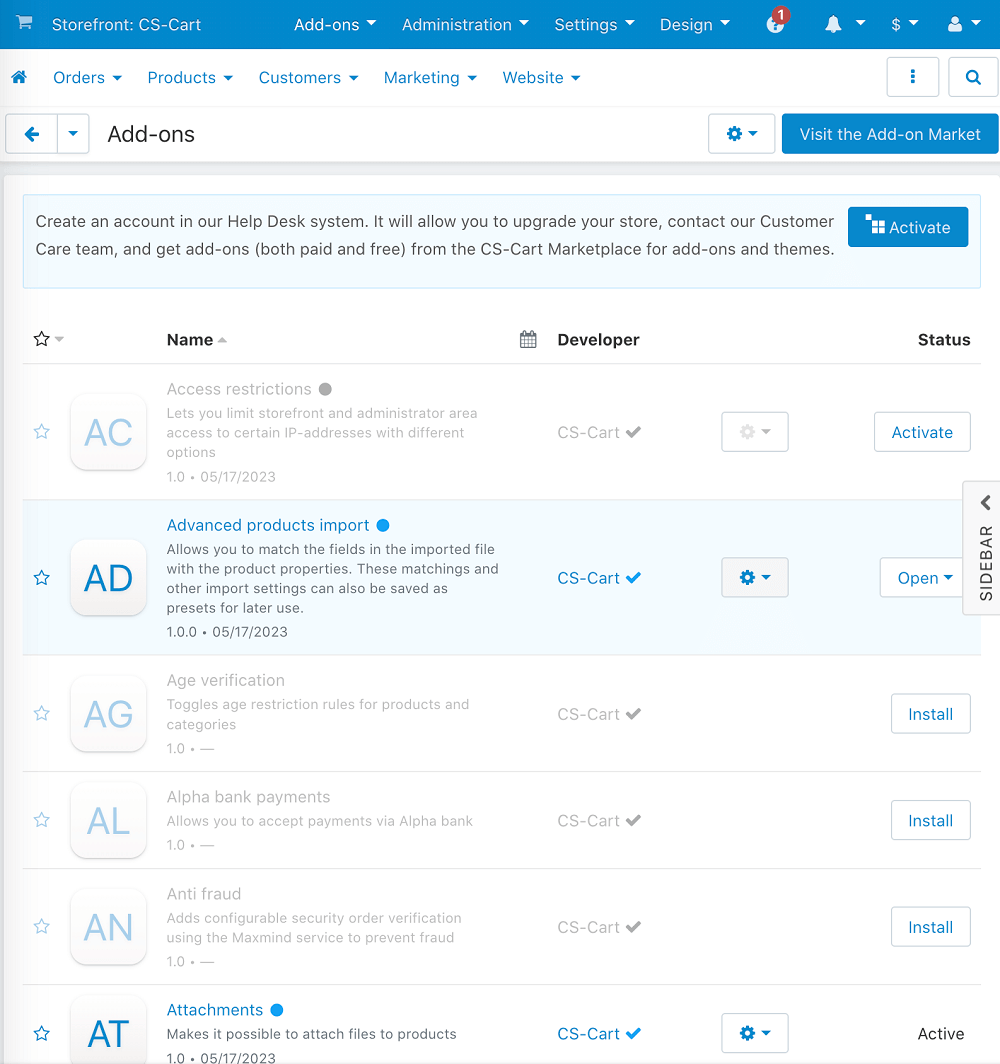
- In the list of available plugins, find BPC and check whether it is active or not. Otherwise, activate it.
- Proceed to plugin configuration.
Configuration
To configure the payment plugin, do the following.
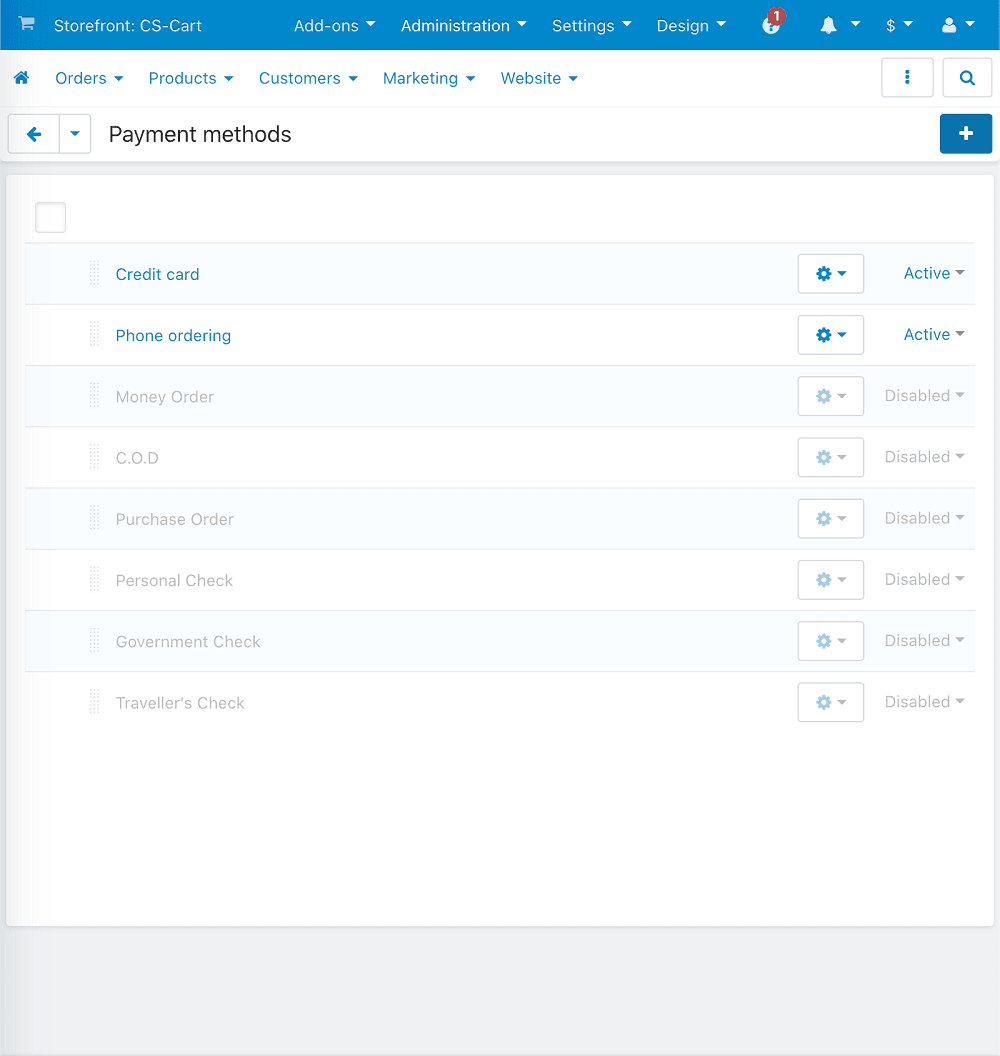
- Log in to your site as administrator and select Administration > Payment methods.
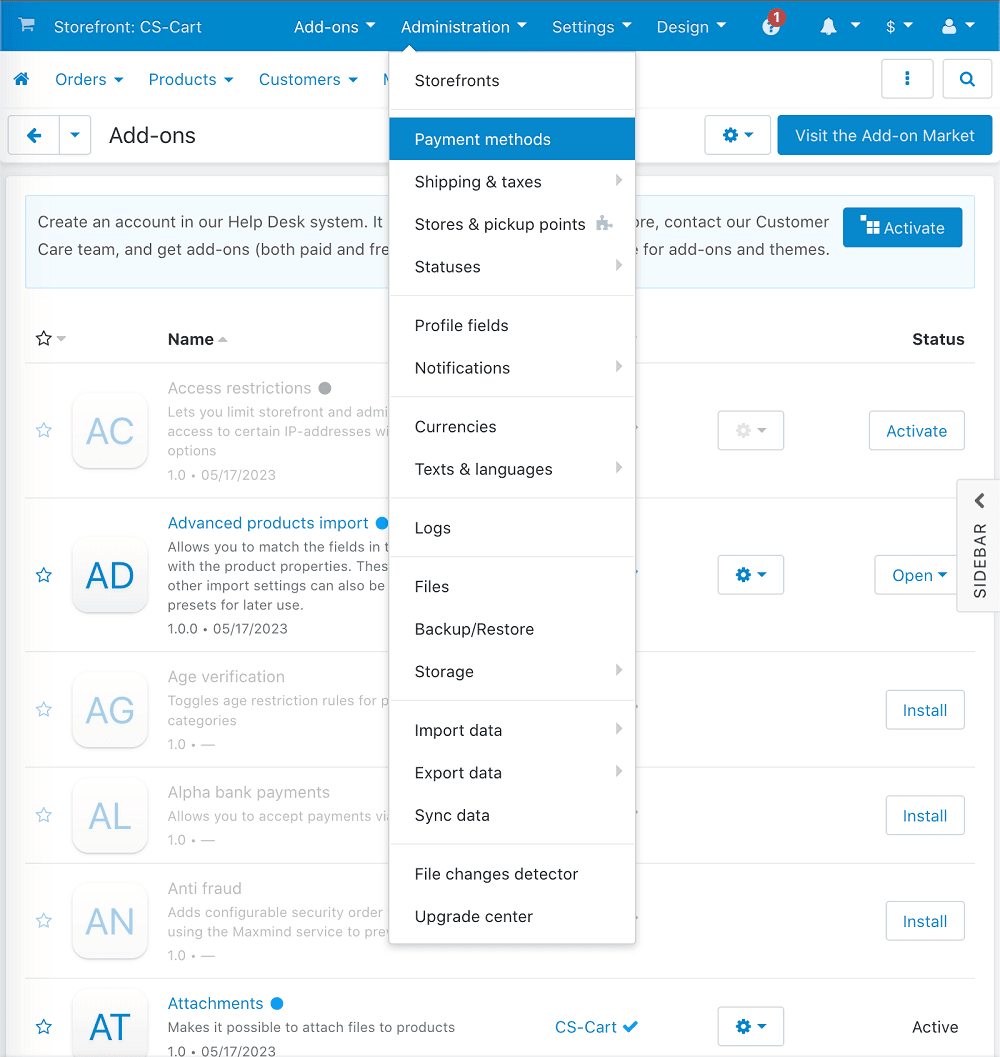
- In the Payment methods page, click
 (Add payment method).
- Adjust the settings using the table below.
| Setting | Description |
|---|---|
| Name | Set a name for the payment method. |
| Processor | Select BPC from the list. |
| Status | The switch button is placed at the bottom of the form. Make sure that Active is selected. |
After the processor is selected in Processor field, the Configure tab appears next to the General tab.
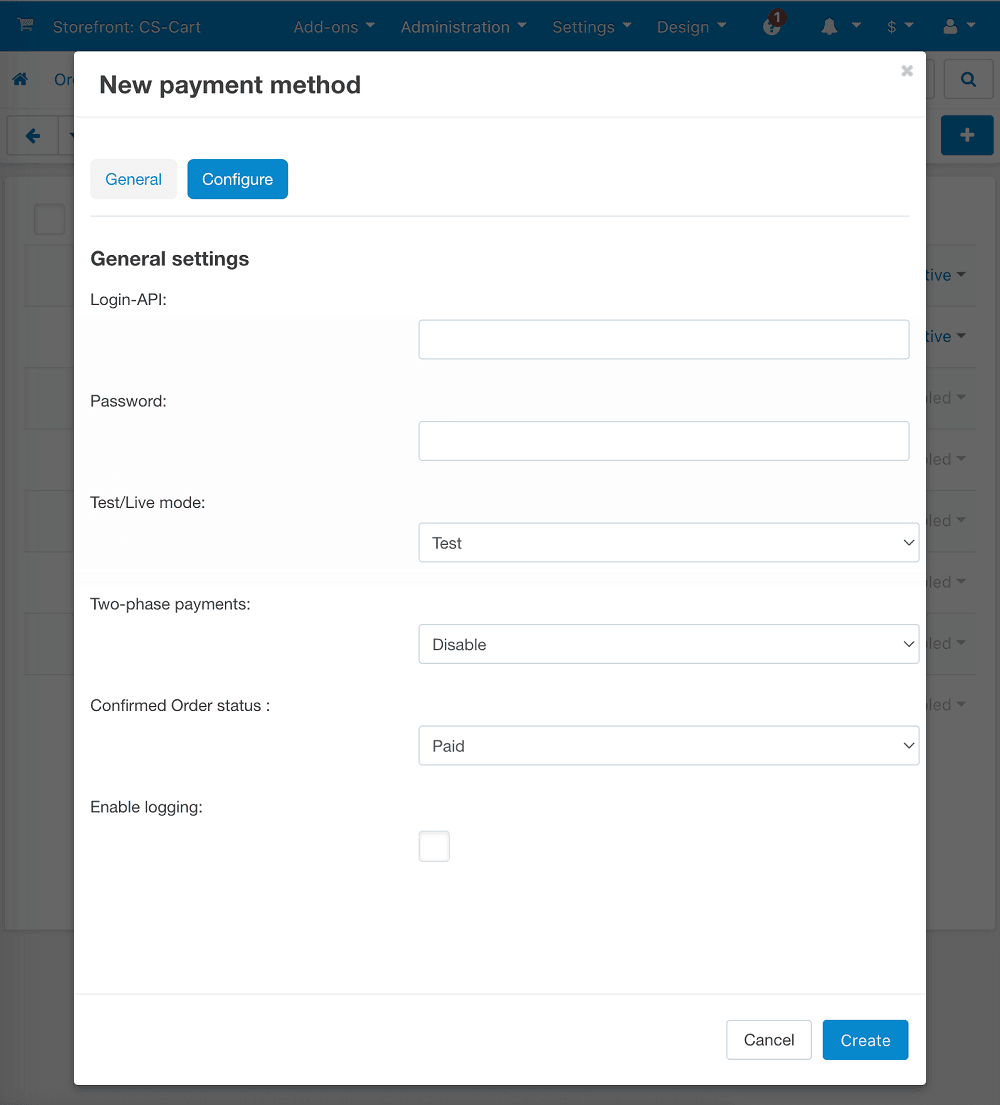
Open the Configure tab and set the parameters.
| Setting | Description |
|---|---|
| Login-API | Your API account login. If the plugin works in test mode, enter test API login. If the plugin works in production mode, enter production login. |
| Password | API account password. If the plugin works in test mode, enter test password. If the plugin works in production mode, enter production password. |
| Test/Live mode | Defines plugin work mode: test or production. |
| Two-phase payments | Enables/disables two-phase payments. |
| Confirmed Order status | Allows to specify what status will be assigned to the order when it is completed by the CS-Cart system. |
| Enable logging | Enable/disable event log. |
| Setting | Description |
|---|
Click Create button.
PrestaShop
With this plugin for PrestaShop your customers will be able to make purchases via our payment page.
| PrestaShop version | Download link |
|---|---|
| 1.7.x, 8.x | Download plugin for PrestaShop 2.9.4 Oct 17, 2025 |
Installation
To install the payment plugin, complete the following steps:
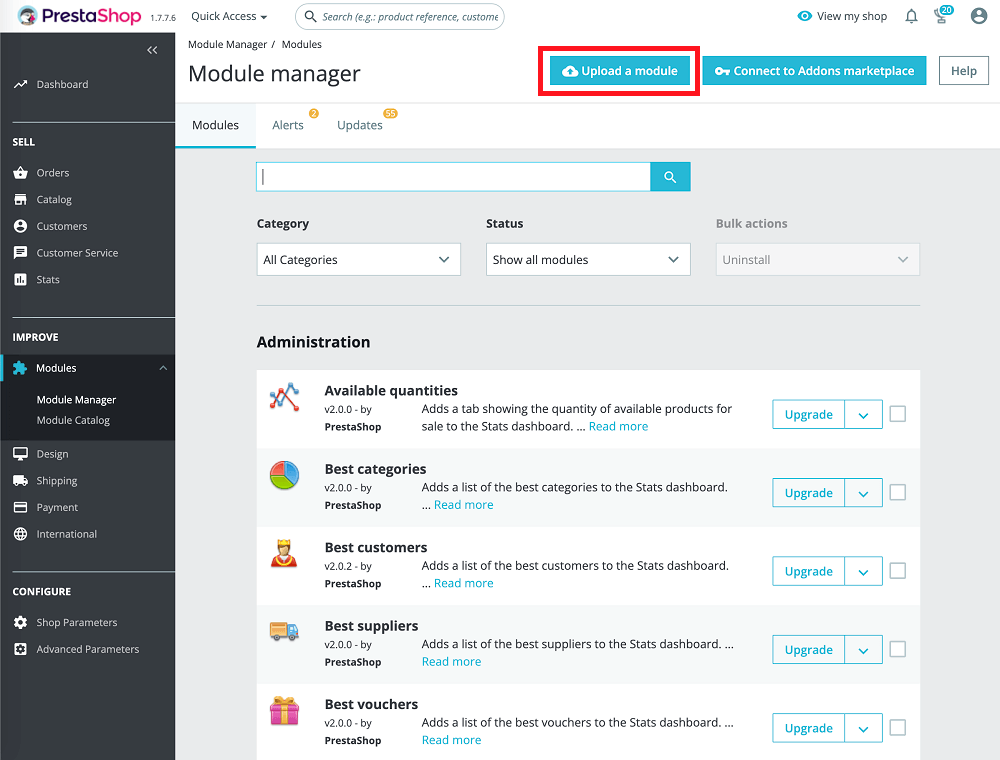
- Sign in to PrestaShop administrative panel and in the side menu select Dashboard > Improve > Modules > Module Manager.
- On the page that opens, click on the Upload a module button at the top right-hand corner.
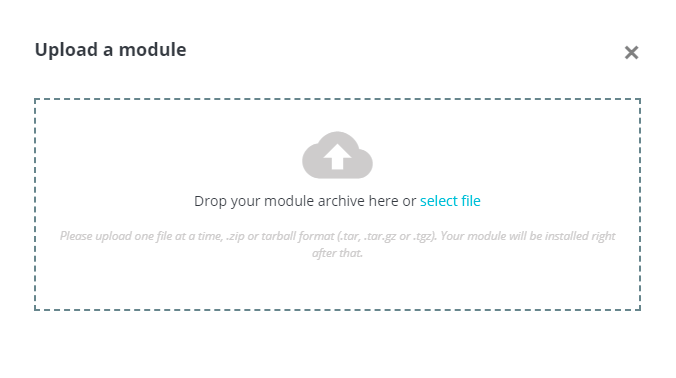
- Drag and drop the downloaded archive to the designated area of the screen (alternatively, click on select file and naviagate to it in the standard Open-File dialog).
- Wait for the installation process to finish.
- To proceed to configuration of the module right away, click Configure. You can also opt to do it later. The configuration procedure is covered in the next section.
Configuration
To configure the payment plugin, complete the following steps:
- Sign in to PrestaShop administrative panel and in the side menu select Dashboard > Improve > Modules > Module Manager.
- Locate the
BPCmodule and click the Configure button next to it.
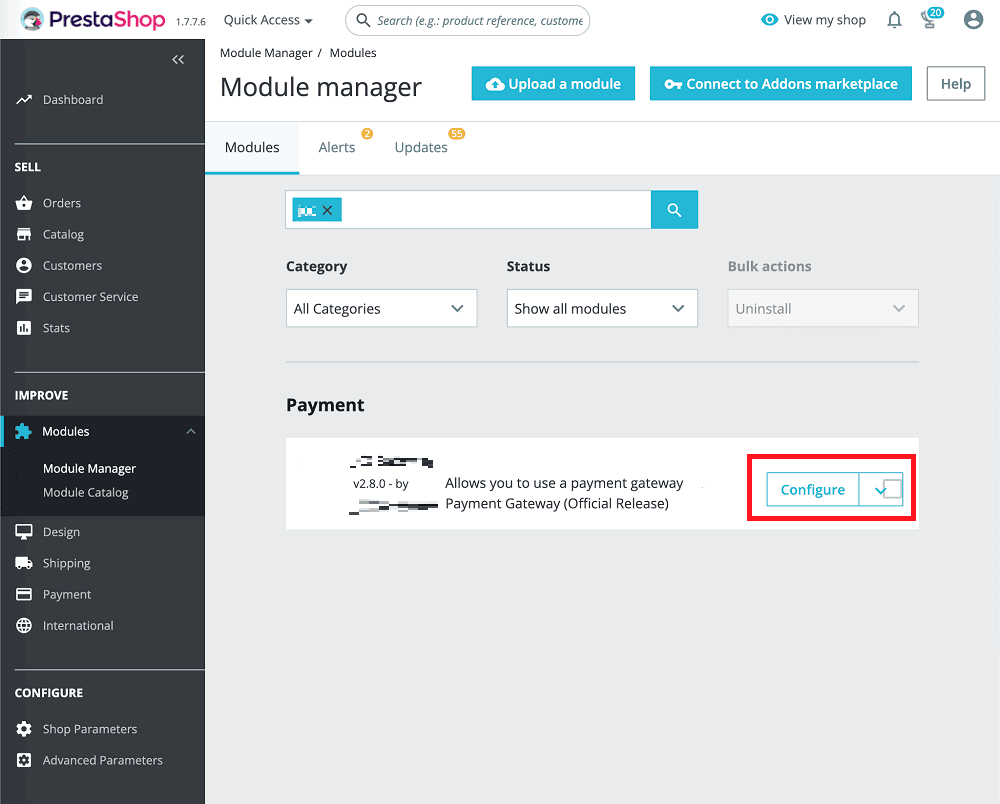
- The module configuration page will open.
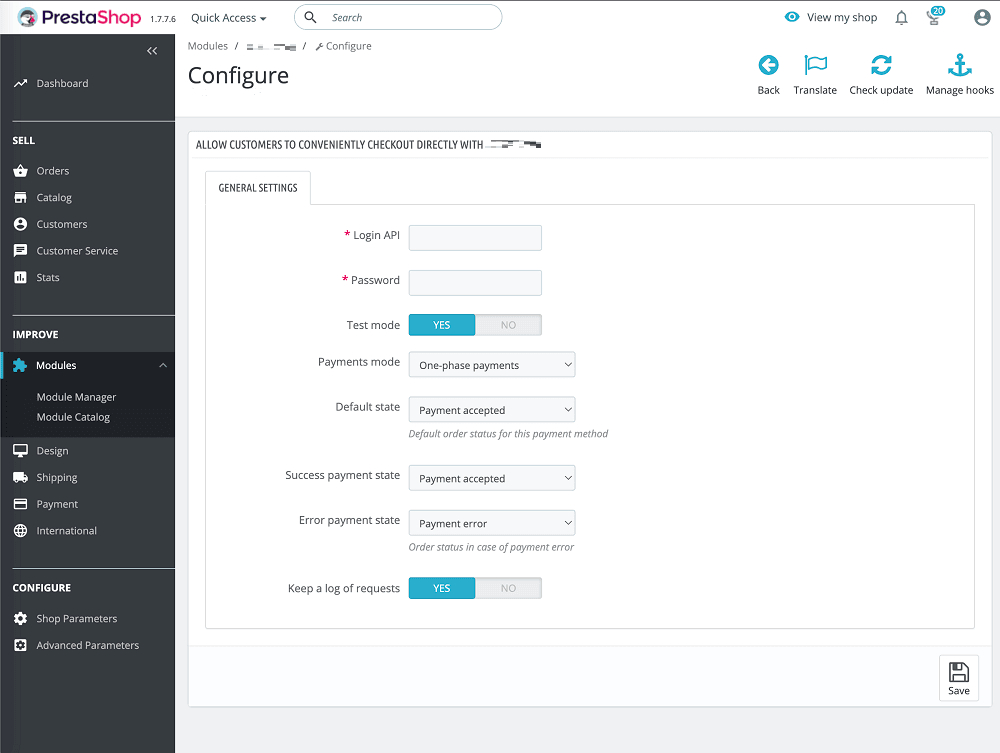
Configure the settings on the General settings tab using the table below.
| Setting | Description |
|---|---|
| Login API | API login provided by your bank. |
| Password | API password provided by your bank. |
| Test mode | Defines whether the plugin works in test mode (YES) or production mode (NO).Note that login and password for test and production modes may differ. |
| Payments mode | Defines the payments type: one-phase payments or two-phase payments |
| Default state | Order status to be shown in PrestaShop and to customers by default. |
| Success payment state | Order status to be shown in PrestaShop and to customers in case of successfull payment (for one-phase mode) or holding of funds (for two-phase mode). |
| Error payment state | Order status to be shown in PrestaShop and to customers in case of a payment error. |
| Keep a log of requests | Defines whether the log of requests is saved (YES) or not (NO). The logs are saved in PrestaShop logging folder and can be accessed by the administrator only. |